How to Install the ServerOwl™ Pixel on WordPress?
Last modified: April 9, 2019
There is no native method for installing pixels on WordPress and you'll need to install a plugin or modify your theme files directly. To monitor your WordPress website for outages, first you have to create a ServerOwl Account or Campaign for your website, we can then look at installing the pixel on your website. Once the Account or Campaign is created, you should be able to access the HTML code for the pixel.
Firstly you should check to see if you have already installed a plugin on your system that allows you to add HTML code to your website without any additional plugin. If you can't find any plugin that already installed, then you'll need to choose to modify your theme or to install a plugin.
Installing via Your Theme
Installing the ServerOwl pixel directly into your theme is probably the easiest method, but has the drawback to requiring you to re-install the pixel each time change your theme. This is just additional hassle that you'll need to consider each time you update your WordPress website.
Under [wordpress_dir]/wp-content hemes\[currently selected theme], there is nearly always a file called footer.php. It doesn't have to be the footer.php file, but it's normally the most convenient place to put it. Open this file up and paste the ServerOwl pixel code into the file between the wp_footer() code and the </body> tag so it looks something like:-
<?php wp_footer(); ?>
<!-- BEGIN SERVER OWL AVAILABILITY CODE -->
<script type='text/javascript'>(function(i,s,o,g,r,a,m){i['ServerOwlObject']=r;i[r]=i[r]||function(){(i[r].q=i[r].q||[]).push(arguments)},i[r].l=1*new Date();a=s.createElement(o),m=s.getElementsByTagName(o)[0];a.async=1;a.src=g;m.parentNode.insertBefore(a,m)})(window,document,'script','//www.serverowl.net/javascripts/pixel.js','sat'); sat('ta','<Insert your Account Slug>');sat('tc','<Insert Your Campaign Slug>');</script>
<noscript><img height='1' width='1' style='display:none' src='//www.serverowl.net/index.php/pixel.png?v=0&ta=<Insert your Account Slug>&tc=<Insert Your Campaign Slug>&st=0' /></noscript>
<!-- END SERVER OWL AVAILABILITY CODE -->
</body>
</html>
Installing via a Plugin
If modifying your theme is too technical or you regularly update your theme and don't what the hassle of continually re-installing your ServerOwl pixel, then the better option for you is to install a plugin that will allow you to set and forget.
The first step is to go and download the Head, Footer and Post Injections plugin. Once downloaded, extract the files in the zip file and copy them into your [wordpress_dir]/wp-content/plugins/ directory. This will allow you to enable the plugin in your WordPress admin interface. You also have the option of going to the options page and configuring the plugin to your specific needs.
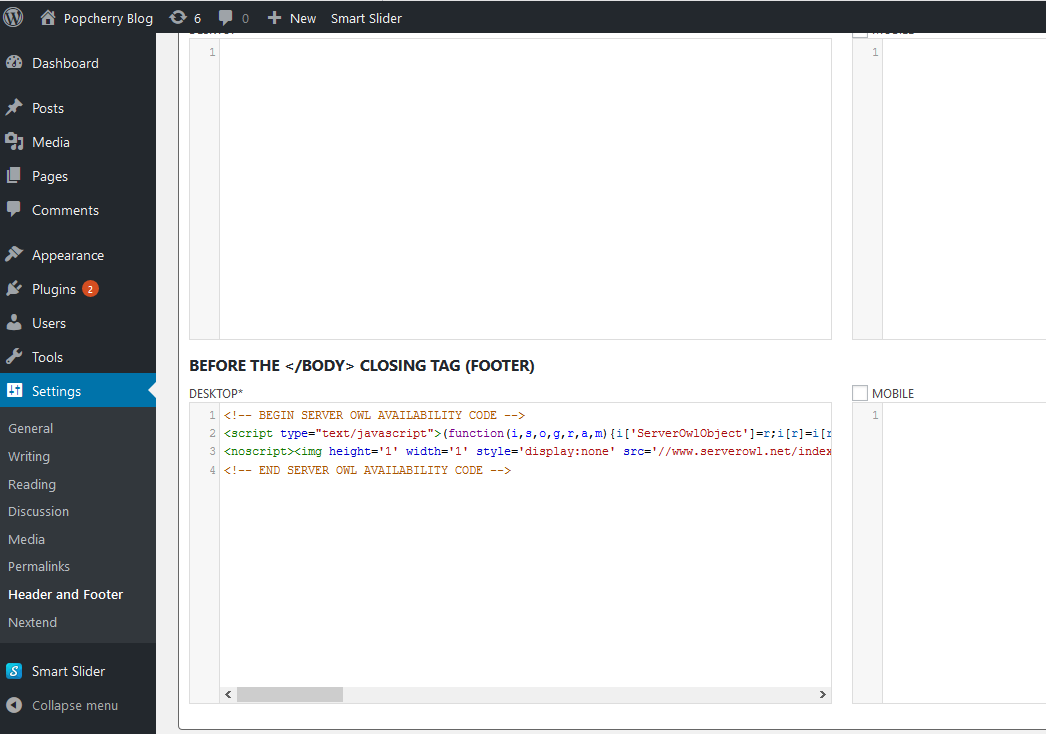
Once the Header and Footer plugin is installed and activated, you can now navigate to the Settings → Header and Footer in your WordPress dashboard to access the plugin's interface. In the lower box entitled "Before the </BODY> closing tag (footer)", you can now cut and paste your ServerOwl pixel.
It should look something like this:-

Figure 1

Comments (0)
Please Log In
X