How to Unsubscribe from ServerOwl™ Email & SMS Messages?
Last modified: September 1, 2019
ServerOwl offers various messages for its site users and those messages may or may not be relevant to all users. For this reason, we allow users to register and unregister for message from individual subscriptions. In this FAQ, we'll describe how you can control the messages for the Monthly Management Reports, individual Server Monitoring, ServerOwl Newsletter and Site Comment replies.
To view a list of your currently subscribed messages, you should log into your account and select the 'Subscriptions' tab in your profile screen. From the following table as shown in figure 1 below, you can see the list of the subscriptions you are currently registered to receive. And trash icons on the right that will allow you quickly unsubscribe from each of the particular message groups. This ability to remove yourself from a subscription is available to all users, even if they don't have permission to edit an account.

Figure 1
Monthly Management Reports
To add or remove users to an Account's monthly management report, firstly navigate to the account settings sections by clicking the 'Settings' button at the bottom of the navigation bar on the left in the desktop view, or on the bottom of the popup menu in mobile view. Once you have the account settings view, then select the account you want to add a site user to from the dropdown and then press the 'Monthly Report' button below it. You should now be able to see the view in figure 2 below.

Figure 2
From this screen, you can now see which users currently are registered for this Account's monthly report, and can add or remove users from this list if you have Writer's permissions to the individual account. To add a user, select the input box at the bottom of the table and start typing the user's name or email. Once you have over three characters, a drop down list should appear for you to select the appropriate user. To remove a user, press the trash icon on the right of the name of the user.
Server SMS & Email Notifications
Once you create a server within your account, you can now select to receive either SMS or email notifications for service disruptions your server. First navigate to the account settings on the bottom of the menu bar and select the relevant account. Once the account has been selected, select the SMS Notifications screen or the Email Notifications screen depending on which method of notifications you wish to receive. You should now be able to see the screen like the SMS screen in figure 3 below.

Figure 3
Like the monthly report screen above, you can now select or remove individual site users who should receive notifications from your monitored servers. Additionally for monitored servers, you can change the server settings to silence different groups of notifications from the 'Server Management' screen. If your sever has a tendency to falsely trigger certain types of notifications, such as the Incomplete, Timeout, Failure or Slow notifications, then you can silence that type of notification from this screen.
ServerOwl Newsletter
To register or unregister yourself from our newsletter, you can remove yourself from the newsletter by clicking the trash icon in the Subscriptions table as described in this FAQ intro. Or you can select or deselect the newsletter checkbox in the user profile section as described below.
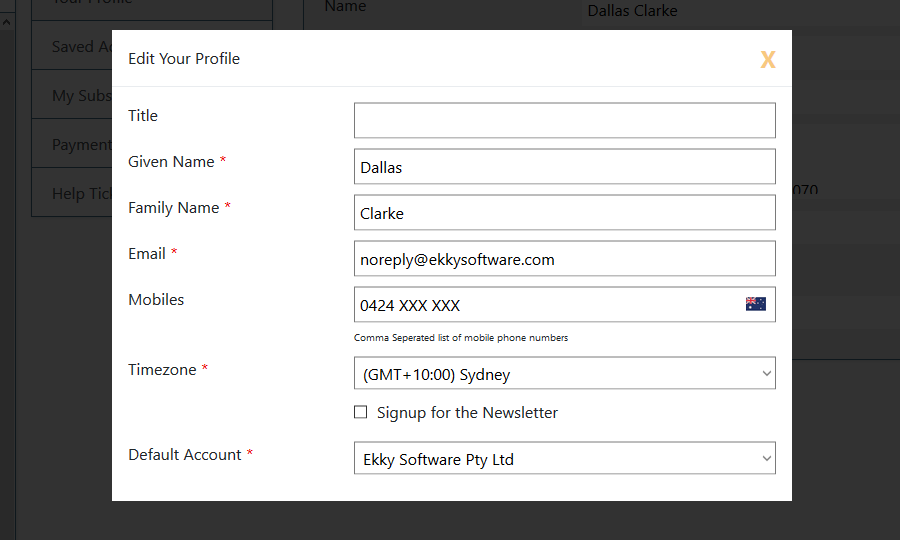
Firstly navigate to your user profile screen by selecting the profile button by clicking on your user name in the top left-hand corner in desktop view, or no the bottom of the dropdown menu in the mobile view. From this screen, you should be able to see your personal details. By clicking on the inputs for your name, email or phone number, the edit popup screen should appear as seen in Figure 4 below. From this popup, you can select or unselect the newsletter option. Once you have completed your selection, click on the darkened background behind the popup dialog to save the new details.

Figure 4
Site Comments Replies
If you have commented on one of the site page and select to listen to all the responses, you can mute those replies to that comment. You can do this by clicking the trash icon next to the comment in your user profile section as described above, or by coming back to the page with the comment and deselecting it from your original comment.

Comments (0)
Please Log In
X